.

Wednesday, December 28, 2011

What's cooking Wednesday - Maple walnut biscotti


Ingredients
1/2 cup vegetable oil
1 cup white sugar
3 1/4 cups all-purpose flour
3 eggs
1 tablespoon baking powder
1 cup chopped walnuts
1.5 tablespoon maple extract
(This recipe yields 3-4 dozen biscottis)

Directions
1.Preheat the oven to 375 degrees F (190 degrees C). Grease cookie sheets or line with parchment paper.

2.In a medium bowl, beat together the oil, eggs, sugar and maple flavoring until well blended. Combine the flour and baking powder, add walnuts and stir into the egg mixture to form a heavy dough.

3. Divide dough into two pieces. Form each piece into a roll as long as your cookie sheet. Place roll onto the prepared cookie sheet, and press down to 1/2 inch thickness.

4.Bake for 25 to 30 minutes in the preheated oven, until golden brown. Remove from the baking sheet to cool on a wire rack.

5. When The cookies are cool enough to handle, slice each one crosswise into 1/2 inch slices. Place the slices cut side up back onto the baking sheet.

6. Bake for an additional 6 to 10 minutes on each side. Slices should be lightly toasted.


7. Unless you plan to eat it all right away, store it in a good air tight container. I only choose Lock & Lock for this.


Enjoy!
Until next time,

Sunday, December 25, 2011

Our home grown Christmas tree!

Merry Christmas everyone!

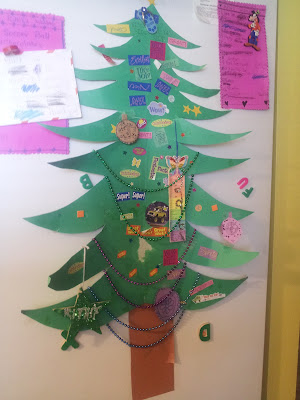
This year, instead of buying a full size Christmas tree and throwing it out later and add to the trash, I decided to be creative and minimize the carbon footprint of Christmas in our house. And while I was at it, I also decided the kids can learn a thing or two about what "naughty" and "nice" means... And voila, the Mission Christmas tree was created...

Right after Thanksgiving, I took a green poster board and cut out a Christmas tree structure. I made the trunk from brown construction paper. This "Base" tree was then attached to the side of the fridge! I also made an ornament from cardboard as a starting decoration and did some basic decoration on the tree.


I marked one side as Reya's side and the other as Rithik's side. Then I told the kids that they had a whole month to decorate the tree, BY BEING NICE!... Basically if they are nice, they will earn stickers, ornaments and stamps that they could use to decorate their side of the tree. The kids also out up their wish lists and letters to Santa there and they started working to earn "nice" decorations.


By the Christmas eve, the tree was fully decorated and I had 2 NICE and happy elves who were proud of their accomplishments...

Operation Christmas Tree was definitely a success and the kids and I are looking forward to another mission like this soon... Mission Valentines may be!!!